

Vegan Eggrolls – No oil, low sodium
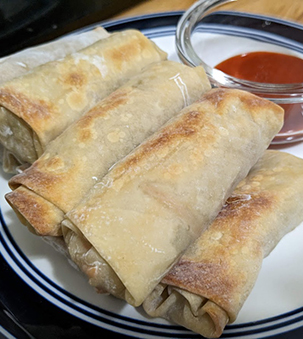 This recipe comes from Kevin Pink, Deputy Director of Economic Development. Nothing about these is authentic to any particular culture. These are just a tasty snack that is also vegan friendly and doesn’t require a lot of skill or experience, nor the potential of third-degree burns from a deep fryer. If you like them, definitely explore some more authentic asian-style eggroll recipes- there are a lot of great ones out there! Try Kevin’s recipe for yourself with local ingredients from Guido’s Fresh Marketplace or Berkshire Food Co-Op.
Ingredients:
- 450g/5.5 cups shredded cabbage (cut ¼” wide, in roughly 2” segments)
- 150g/2.5 cups shredded carrots (about 2 medium carrots cut 1’8” thick, 2” long)
- 280g/2 cups cooked brown rice (basmati also works well)
- ½ white or yellow onion, finely diced (optional)
- 3-5 cloves garlic, grated (microplane/zester is ideal for this)
- ½ – ⅔ cup nutritional yeast (Yes, this ingredient needs a rebranding badly. However, it is non-negotiable. It is the drummer of the filling’s flavor- it’s not flashy, but you’ll miss it if it’s not there. I like Sari’s brand because it is less processed, but you can sub another nutritional yeast if that’s easier for you to get- Bob’s Red Mill is fine also.)
- ½ cup rice vinegar
- 1-2Tb low-sodium soy sauce
- Red pepper flakes, black pepper to taste
- Vegan egg roll wrappers (I like Twin Dragon, but Nasoya are more widely available)
- Roughly 1.5 cups of water in a bowl for sealing
Instructions:
- Begin cooking your rice. Chop all vegetables except garlic. Add red pepper flakes. Saute in a frying pan (I use water, but go ahead with oil if you prefer that – live your best life) over high-medium heat until softened, adding more water as needed to keep vegetables from sticking.
- Add cooked rice to vegetables, stir in grated garlic.
- Add vinegar and nutritional yeast, tossing to coat. You may need to add more water to get things to combine. Once all of your ingredients are friends, add soy sauce and black pepper. Remember that you will typically be serving this with some kind of salty/sweet sauce, so it’s okay if the filling is a little on the milder tasting side. Conversely, feel free to go nuts here – this is your circus. Ultimately, you want to cook things down until there is no free moisture left in the pan. Wet filling will leak out of your eggrolls, and that is a tragedy.
- Let this mixture cool in your refrigerator for two hours (freezer for 45 minutes will do it also). Again, you’re trying to eliminate excess moisture, and this has the added bonus of not potentially burning your fingerprints off while you’re filling eggrolls.
- Spoon roughly 1.5 tablespoons of filling into the eggroll wrapper, diagonally so that the ends of your line of filling are aligned with two opposite corners of the wrapper. This doesn’t have to be exact – you’ll find that you have one spoon of the perfect size for what you prefer. Stick to that magic spoon. It knows the way. The amount of filling should look like just barely not quite enough. You’ll be surprised.
- Dip a finger tip into the water and run it around the outside ½” of the wrapper. This is going to create your seal.
- Fold in the two opposite corners your line of filling connects, placing one over the other.
- Use your fingers to crimp this pocket down around your filling, which will keep it from sliding around like an unsecured muffler on a bumpy road.
- Fold the bottom of the eggroll wrapper up over the pocket you have created. Wet the “triangle” of interior wrapper space to ensure a strong seal. From there, begin rolling the wrapper over, keeping the sides in tight so that you don’t end up with a taquito.
- Now that you have a happy little mini burrito, wet your fingertip again and rub it over the seam. Ideally, you will see some of the flour on the outside of the wrapper mix into the water, which is what will create a really tight seal.
- The last step is forging these packets of goodness in the heat, burning away your apprehensions and leaving only true deliciousness. I use a toaster oven with an air fryer feature. Placing them on a foil-lined tray, cook 10 minutes on one side (until the wrapper begins to brown), then flip over and give them another 10. Use the intervening time to roll more, because you have a busy week ahead and will want eggrolls for it. I have never had a lot of success in a traditional oven with these, but if that’s your only option, I believe in you.
Note from Kevin:
These freeze exceptionally well- they’re in this journey with you for the long haul. I place three at a time into a square of foil and have never found a practical maximum for how long they can be frozen. When you’re ready to thaw them, microwave for one minute to wake them up, then gently separate them (they *will* be frozen together) and give them ~10 minutes in the toaster oven to finish. Serve with a sauce of your choice – sriracha is my go-to. There’s basically no wrong answer, so you do you. Just don’t do something weird like funfetti frosting.