Just for fun: Kevin’s Two Berry Banana Bread
July 24, 2023 // News
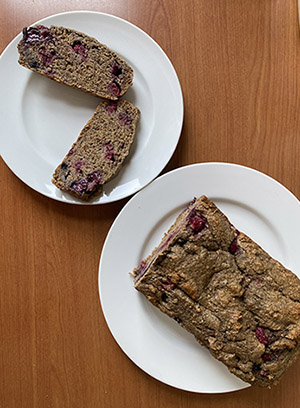
Two Berry Banana Bread – vegan, no oil, low sodium, no added sugar, extremely low effortThis recipe comes from Kevin Pink, Deputy Director of Economic Development. This tasty treat makes a great snack for a hike, a zero-hassle dessert for a picnic at Tanglewood, or a sweet breakfast toasted with your morning coffee. Whether bought in a store or a farmers market, or picked with your very own hands, you can put your Berkshire berry bounty to work for crowd-pleasing results! Here in the heart of the Berkshire summer, berries are plentiful. Whether you get them from a farmer’s market, a pick-your-own berry farm, or just the grocery store (I’m not judging your berry supplier, you do you), the Berkshires offer a bumper crop of delicious fruit this time of year. You can make jam or pie, but those take a lot of effort. It’s too hot for that kind of work right now. Consider this your permission to treat yourself while putting in minimal effort. As a bonus, this is pretty healthy as treats go, and makes for a solid dessert. Ingredients:Dry:
- 1 ½ cups whole wheat flour
- ¼ cup of flaxseed meal/ground flax seeds
- 1 teaspoon baking soda (use sodium-free baking soda/powder to make this recipe no sodium)
- ½ teaspoon baking powder
- ½ teaspoon cinnamon
- ½ teaspoon nutmeg
Wet:
- 3 ripe bananas (heavily-freckled to completely brown)
- ⅔ cup unsweetened applesauce
- 1 teaspoon vanilla extract
- 1 ½ cup mixed frozen blueberries and raspberries (penny-sized or smaller diameter)
Instructions:
- First off, preheat your oven to 350°. Start here, because your oven will probably be up to temp by the time you’ve mixed the other ingredients.
- Combine the dry ingredients in a bowl. Feel free to add other warming spices if you want. I don’t think this needs any additional sugar, but if you want to add some local honey, maple syrup, or not-at-all-local agave nectar, go for it. You are the captain of your own destiny.
- In a separate bowl, mash your bananas. You can do this with ripe bananas you have laying around, but for peak laziness, freeze ripe bananas for a day or two ahead of time and then let them thaw to room temperature for two hours before you get started. Use a pair of kitchen shears to snip the top of the bananas off and open the skin, then extrude that delicious banana goo, which is mostly liquid already. Let thermodynamics do the hard work of breaking down the cell walls, so all you have to do is stir around until you have something the consistency of a beaten egg.
- Mix the applesauce and vanilla into your bananas. Feel free to include more vanilla than this recipe calls for- nobody in recorded history has ever been mad about extra vanilla flavor.
- Fold the wet ingredients into the dry ingredients with a spatula just until everything is evenly combined. I’m not sure it’s possible to overmix this, but there are some things that humanity is not meant to know. Do not seek this forbidden knowledge; that way lies madness.
- Once your batter is mixed up, add your frozen berries and mix gently until they are evenly distributed. Frozen berries hold up better during the mixing process, and like the bananas, end up much softer as a result of being frozen, for a really pleasant asymmetric textural experience in the finished product. Speaking of which – did you know that botanically, raspberries aren’t berries, but bananas are? Scientific classifications are wild! Anyway, if you want to just call this berry bread, you’re technically correct, and it gives you the opportunity to drop this fact on people if you need an emergency conversation starter.
- Place your berried batter in a 9”x5” loaf pan. I put parchment paper in the pan first, lining the bottom and sides and extending ~1” above the rim, which both prevents the bread from sticking and gives you an easy way to lift it out of the pan once it’s done cooking. If you’d rather use a cooking spray or a silicone loaf pan, that would probably work fine, but you’ll have to blaze that trail yourself, friend. I believe in you.
- Bake at 350°F for 45-55 minutes. You’ll know it’s done when you stick a toothpick into the center and it comes out clean. A cake tester will work just as well, for obvious reasons. I guess you could use a butter knife if you’re some kind of barbarian, but a potato masher is just wrong.
- Let it cool for at least 30 minutes. As tempting as it will be, immediately cutting a slice of this hot deliciousness is robbing yourself of the correct textural experience while the bread finishes setting. You’re also risking some unfortunate oral burns, because again, this thing was just in a 350° oven. Patience is a virtue, and in this case, it will be rewarded with a symphony of different flavors and textures.
Notes from Kevin:
- This is a great way to use up bananas or other berries that are on the edge of overripe! Just let them chill out in your freezer until you have the time to throw this together.
- The one downside to this recipe is that it doesn’t take long for it to start growing bread mold in a hot, humid Berkshire summer. On the off chance that it doesn’t disappear rapidly due to human consumption, it freezes and thaws well!
- Experiment with other fillings! I’d stick to frozen if you’re using berries, but raisins/craisins or chocolate chips would probably be strong additions here. You don’t always have a lot of freedom in baking, but I think you should follow this confectionary rabbit hole all the way down.